
What is all this?
While developing Vectronom, we have come up with many different ideas on how to connect the music we make and the game further. We developed tools to change the music of the game, play the game with our own music instruments as controllers, or even make visual performances by changing the colors of the game while it’s being played!
You can see us perform using these tools at STUNFEST 2019 here:
We think that these tools push the boundaries of how we define both music and games, and are very curious to see what you can make of them, so we have included them all in the final game 🙂 On this page you can find more information on how the individual settings and features work.
Click Mode / Analog Sync
While Click Mode is enabled, the music output of the game is disabled, and instead a click signal is played in mono configuration. You can then connect your headphone or line output to devices like sequencers, modular synthesizers or drum machines. The signal plays at 24ppq and follows the speed and timing of the current level, letting you create your own soundtrack to your favourite Vectronom levels, or even perform it live!
You can enable „Click Mode“ in the Options of Vectronom:
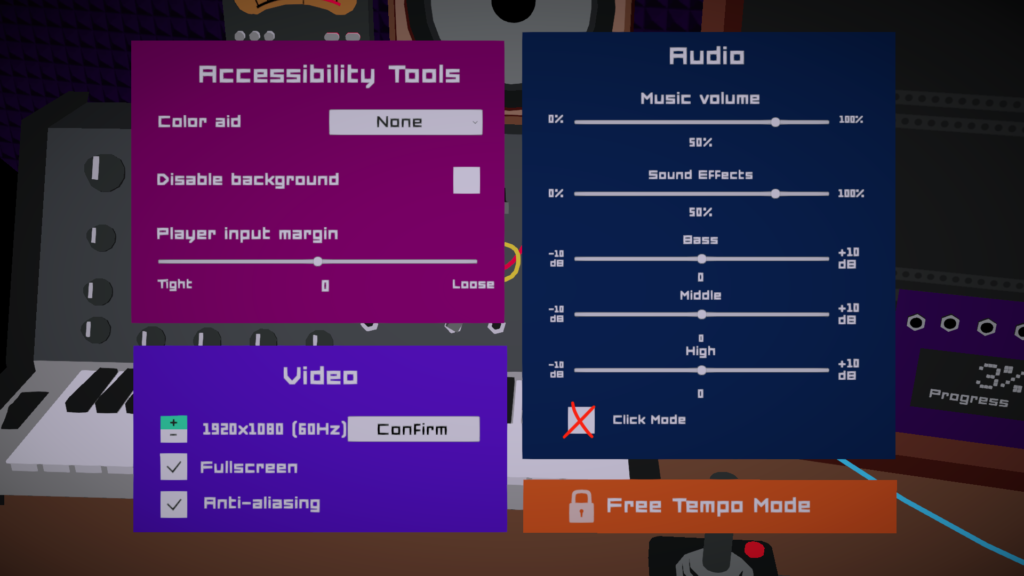
Warning! When Click Mode is enabled, a loud audio signal is generated that may potentially harm speakers. Make sure to lower the volume or disconnect your speakers before enabling it!
Mapping MIDI Controls
All four players of Vectronom can be controlled by MIDI notes. This not only allows you to play Vectronom using Drum Kits, Pianos and other MIDI controllers, it’s also possible to record and loop levels using MIDI sequencers and more!
Vectronom automatically connects to all connected MIDI devices when the game is started. Each movement key of each player (up, down, left, right) can be mapped to any note / channel combination. To map a player’s keys, first make sure that only the MIDI device that you want to map is sending notes – you don’t want to accidentally map the wrong device! Then you can either press the respective ‚MIDI‘ button in the Controls Menu or press and hold the ‚M‘ key, then press the key with the player number (1, 2, 3, or 4). A prompt will appear in the lower right corner of the screen asking you to play the note you want to associate with the corresponding keys. Simply play the note for ‚up‘ first, followed by the note for ‚down‘, ‚left‘ and ‚right‘.
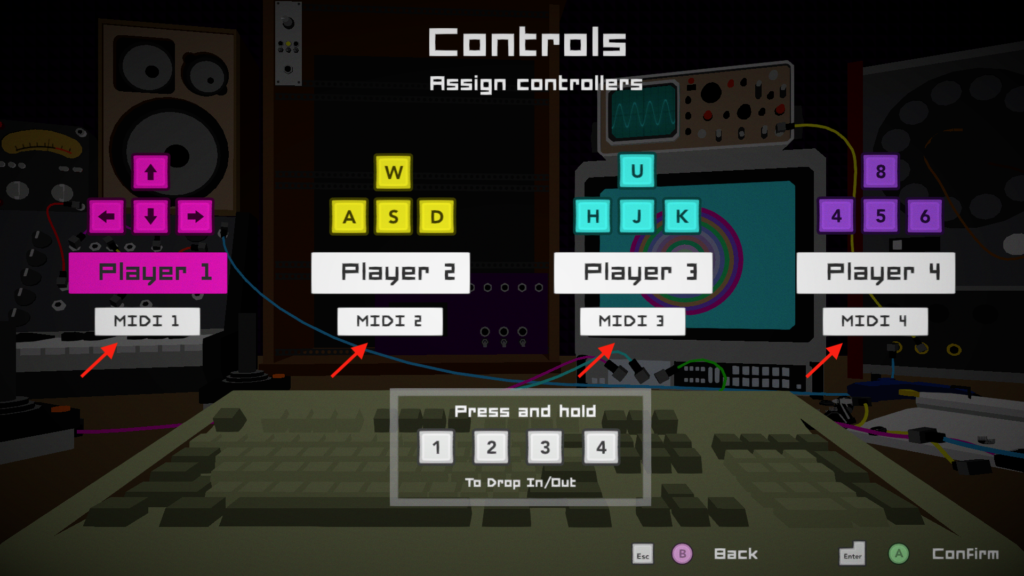
To disable a mapping, press and hold the ‚M‘ and ‚SHIFT‘ keys, then press the key with the player number (1, 2, 3, or 4).
MIDI Color Mode
You can enter MIDI Color Mode by pressing and holding the ‚M‘ key, then pressing the ‚C‘ key. The colors of the game should change immediately.
While in MIDI Color Mode, you can send RGB colors to the Game via MIDI CC Messages as follows:
| CH | CC | Color |
|---|---|---|
| 7 | 0, 1, 2 | Ground |
| 7 | 3, 4, 5 | Background |
| 7 | 6, 7, 8 | Level Exit |
| 7 | 9, 10, 11 | Spiky |
| 8 | 0, 1, 2 | Ground (in Level Exit Circles) |
| 8 | 3, 4, 5 | Background (in Level Exit Circles) |
| 8 | 6, 7, 8 | Level Exit (in Level Exit Circles) |
| 8 | 9, 10, 11 | Spiky (in Level Exit Circles) |
Just like for MIDI Controllers, the game will connect to all connected MIDI devices when it starts automatically.
As you can see, that’s a lot of CCs that are hard to fit on one controller. That’s because the MIDI Color Mode wasn’t really designed to be used directly with a hardware controller, but rather together with a „color synthesizer“ like the one that we will release very soon – but feel free to experiment with your own tools as well 🙂